Code Snippets
I code in my free time, so I have accumulated a handful of useful bits that can be copypasted easily, I'll add more until I run out of ideas. If you have any request for a specific function you want me specifically to give attention to you can send me an ask on tumblr.
These are meant for people who have basic understanding the given languages, as to keep them relatively slim and not have to overexplain some steps.
CSS
CSS is the styling languge that goes with HTML, there are a slew of CSS frameworks that can help with writing it, but vanilla is the standard.
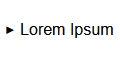
Custom <li> and <details> markers.
Just so that we're all on the same page, the arrow in this example is what I refer to by
marker. By deafult it appears next to <li> and
<details> elements but it can be made to appear next to anything with a
specific CSS implementation which we won't talk about here.
As a start we need to identify a marker's CSS selector, which is easy if we just go into the Developer Tools of a page with that type of element, like the current page, and find it in the Inspector tab.
Through this method you can find that its selector is ::marker, from here it's
easy to change the icon by using a content attribute and deciding what you'd
like as a replacement.
Picking a replacement is actually harder than you'd think especially when we consider that many special characters can be passed as content since you can use any emoji as such, or you can use an image you made yourself, as I did.
To pass an emoji or test as content you can use the following syntax:
::marker {
    content: 🐻;
}
In this case, the marker becomes a bear emoji but it works with any type of emoji and any text if you put it in double quotes.
Now onto using images, which is also easy, in this case we use a url function to
pass a link to an image on a local server, this can also be an online server with an address
that starts in http or https, it works in the same way.
::marker {
    content: url('/images/marker.png');
}
This however does NOT wrap up this code snippet, since upon opening a
<details> element this will make the marker turn back to default until it
is closed again. We can very quickly fix this in one of two ways: we can either make the
same emoji/text/image be applied even if it is open or we can apply entire new content.
To apply the same content it is extremely easy, we can use a selector list to apply the previous attribute both to a normal marker and one that belongs to an open details element by using the following CSS:
::marker,
details[open]>::marker {
    content: 🗿;
}
What we're doing here is: first selecting a closed marker with the ::marker then
we select a marker which is a child of a details element which is open and apply the same
content to both.
(Remember when I said I'd try to not overexplain things? My bad.)
So with that in mind we can use a similar process to apply a different content to an open marker, this time we only select the marker belonging to an open details element and apply a different content.
::marker {
content: 🐻;
}

details[open]>::marker {
content: 🗿;
}
One last tip to include is to add 5 empty pixels on the right side of any custom marker image as that will make it look closer to the default's spacing.
This concludes this snippet, hopefully this helps making your site more to your liking.
Custom Scrollbar Behavior
This should be an extremely short and easy to explain one since it is not nearly as varied as
the previous snippet. To start customizing your scrollbar you have to first see which parts
are scrolling in your site, you can decide which <div> should scroll by
using this CSS attribute. which we'll apply to a made up div by selecting its class:
.scrollbar-div {
overflow-y: scroll;
}
This method can also be used to apply it to the <body> element, which
makes the site always show the scrollbar.
This is already a third of the way there, next we'll decide the color of the scrollbar.
Deciding the selector for this part is actually somewhat tricky, if you applied the previous
attribute to the <body> you must instead apply the next attribute to
the :root selector, which targets the root of your HTML.
As far as the actual attribute goes you can use the scrollbar-color attribute to
apply 2 colors to the scrollbar, the first one for the scrollbar's background and the second
one for the indicator, this accepts any kind of color including rgb and rgba.
:root {
scrollbar-color: black gray
}

body {
overflow-y: scroll
}
The last attribute to mention is going to be scrollbar-width, which is pretty
selfexplanatory, it defines how wide your scrollbar is, but it does not accept length such
as 5px or anything of the sort, it only has 3 presets:
auto, thing and none, this attribute must be
applied to :root if you put the initial attribute on the
<body> element:
:root {
scrollbar-color: black gray;
scrollbar-width: thin
}

body {
overflow-y: scroll
}
However I do not recommend messing with the width since a thin scrollbar is somewhat annoying to use to some people, but if you use your best judgement you can manage.
This concludes this snippet, hopefully this helps making your site more to your liking.
Flexbox
This is one of the more important snippets since flexboxes are the most popular way to organise a site, many of the people on Neocities use it in one way or the other.
To begin we want to first create a <div> with the style attribute display
set to flex.
<body>
	<div style="display: flex">
	</div>
</body>
This div is what we call a flexbox, everything inside a flexbox gets places from left to right instead of top to bottom like usual, we can use this to make a sidebar like the one you see in this page.
From here we'll make one sidebar on the right, so we'll use a <main> tag
for the main part of the site and an <aside> tag for the secondary
section, for accessibility reasons.
<body>
	<div style="display: flex">
		<main>
			<!--Main Content-->
		</main>
		<aside>
			<!--Secondary Content-->
		</aside>
	</div>
</body>
From here the course of action is fairly intuitive, you can style mains and aside as you like to match the way you want them to fit in the page. You'll generally want to have their widths and their margins (not paddings) sum up to 100% of the page's width.
Now this snippet is over, have fun!
JavaScript
JavaScript is the most used language in day-to-day life, almost every time you interact with a webpage you are looking at JavaScript acting as backend to HTML and CSS.
Play Sound on Click
Let's get right into it, this won't take too many words to explain and it is easily replicable code, so you shouldn't have any trouble.
To begin we need something to click to make the sound, for this purpose we'll make a button in HTML and we'll grant it an ID "sound".
<button id="sound">Play a Sound</button>
The ID's text is not important, it can be whatever you want as long as it's there. Next we'll
go into the <script> section, which can be placed either at the very
bottom of your <body> element or in the <head>
element, and write down some code that identifies which element has the ID we previously
gave our button.
// Assign button to variable.
const button = document.getElementById('button');
This assigns our button to the variable "button", from here we can move on to create our sound by using a constructor.
// Assign button to variable.
const button = document.getElementById('button');

// Create audio player and assign it to a variable.
const sound = new Audio('https://files.catbox.moe/5zptio.mp3');
You are free to use this link during your own testing, I made sure it is at a comfortable
volume for most people. The last step is binding that sound to the button, we do this by
using addEventListener(), so this is the end product.
// Assign button to variable.
const button = document.getElementById('button');

// Create audio player and assign it to a variable.
const sound = new Audio('https://files.catbox.moe/5zptio.mp3');

// Bind sound to button click.
button.addEventListener('click', function() { sound.play() })
The addEventListener() function only accepts other functions as
its second argument, so we have to write function() { sound.play() } to make it work.
Here you can find an example of what we just made.
To make sure your sound is at a good volume I recommend using the free software Audacity to set your sound's Peak Amplitude to around -50dB since I've gone through some trial and error to figure out that it's a good number.
This concludes this snippet, hopefully this helps making your site more to your liking.
Repeating HTML on Multiple Pages
More often than not there will be at least one element that you'll want to appear in every page while being able to edit it easily without going page by page. Unfortunately there is no built-in method to handle this yet so we must find a workaround.
The simplest way to handle this is by inserting an element to use as reference to then add the repeating HTML through JavaScript.
This is obviously not too easy but I'll make sure to explain thoroughly. To begin let's say we want to add an entire div to serve as storage for navigation links, just like the one on the right of this page, we'll first add the div and give it an identifying characteristic, the most convenient one would be an ID.
<div id="nav">
</div>
Once we have our "anchor" element we can immediately go into JavaScript to make sure we've made no mistake.
console.log(document.getElementById('nav'));Running this line of code returns our "anchor", if it gives you an error then make sure you wrote the id correctly and enclosed it in single quotes.
Now we can begin to add the elements into our div.
First we'll want to assign it to a variable for ease of writing, so from now on I'll just refer to it as "anchor".
// Assign the anchor element to a variable.
const anchor = document.getElementById('nav');
Then we can create the elements to put into this div, say we want it to have a title, we'll
start by adding an <h1> element.
First we create it in the memory by using the document.createElement() function and assigning it to a variable.
// Assign the anchor element to a variable.
const anchor = document.getElementById('nav');

// Assign the title element to a variable.
const title = document.createElement('h1');
Then we can start to mold it to our liking by using the setAttribute(), appendChild() and
createTextNode()
functions.
// Assign the anchor element to a variable.
const anchor = document.getElementById('nav');

// Assign the title element to a variable.
const title = document.createElement('h1');

// Set the title's id to title.
title.setAttribute('id', 'title');

// Use appendChild() and createTextNode()
// in tandem to add text in title element.
title.appendChild(document.createTextNode('Title'));
As I said, all this code was to create the element, so now we only need to add one more line to add the title into the anchor.
// Assign the anchor element to a variable.
const anchor = document.getElementById('nav');

// Assign the title element to a variable.
const title = document.createElement('h1');

// Set the title's id to title.
title.setAttribute('id', 'title');

// Use appendChild() and createTextNode()
// in tandem to add text in title element.
title.appendChild(document.createTextNode('Title'));

// Use appendChild() again to insert the title into the div.
anchor.appendChild(title);
This accomplishes what we wanted to do, this process is applicable to other kinds of elements in a very similar manner, for example inserting an image.
// Assign the anchor element to a variable.
const anchor = document.getElementById('nav');

// Assign the image element to a variable.
const image = document.createElement('img');


// Set the image's src to a valid link.
image.setAttribute('src', 'https://picsum.photos/300')

// Use appendChild() again to insert the title into the div.
anchor.appendChild(title);
There are more ways to implement this but this snippet is already long enough and it gives you the basic know-how to apply it to many other cases. I hope this helps you make your website more to your liking.
More snippets to come!
To-do list:
- Light Theme/Dark Theme. (Eventually? Probably sooner rather than later I swear.)